What is Wazuh?
Wazuh is free and open-source XDR (Extended Detection and Response) and traditional SIEM (Security Information and Event Management) combined together in one security platform. Wazuh comes with capabilities to protect workloads across the on-premises, virtualized, containerized and cloud-based environments. Wazuh supports all major operating systems and supports all major cloud providers.
The Wazuh Architecture

Wazuh is agent-server based architecture. Currently these agents can be deployed on servers, desktops, laptops, cloud instances (with connectivity to Wazuh Server), and virtual machines. Wazuh agents are currently supported on most of the common operating systems including Windows, MacOS, and multiple flavours of Linux systems.
Wazuh is comprised of four main components as listed below:
- Wazuh Indexer – This is the core of Wazuh platform providing it analytical and search capabilities.
- Wazuh Server – This is the component that receives the data from the Wazuh agents and process it based on the rules and threat intelligence defined on the platform.
- Wazuh Dashboard – This is the web UI for Wazuh platform.
- Wazuh Agent – These are small agents whose main purpose is to collect the logs and ship it to the Wazuh server.
From the above, Indexer, Server and Dashboard are installed on Server side, where as the agents run on the endpoints / client systems from where the logs are to be collected.
More reference about the Wazuh Architecture and its components can be found on [Wazuh Documentation](Components – Getting started with Wazuh · Wazuh documentation)
Setting up the Wazuh Server
Before setting up the VM, it is advisable to check the system requirements as per your environment needs. Wazuh has provided a reference in their documentation – Wazuh Hardware Requirements. For my home lab, I am using below specifications for the virtual machine that will host Wazuh.
- CPU – 4 cores
- RAM – 8 GB
- HDD Space – 256 GB
- Operating System – Ubuntu server 24.04 (Noble numbat)
Create a virtual machine from the template created earlier when setting up the home lab Creating VM Templates in Proxmox – SecBytes. If you do not have a template created, you can choose to setup a virtual machine as per the specification and install the operating system of your choice. I have chosen Ubuntu for its simplicity and ease to use with Wazuh. Make sure to have proper hardware requirements set as per the required for your environment.
Once the clone is ready, follow the below steps in order to setup Wazuh server with all its three components viz. Indexer, Server and Dashboard. We shall be installing all the three components on one single server. You also have an option to use multiple servers. Please ensure that your server meets the minimum requirement as specified in the Wazuh Documentation under each component section.
Indexer Installation
Step 1:
Before installing the indexer, let’s generate the SSL certificates that Wazuh will use to interface between multiple components and nodes. To generate these certificates, download wazuh-certs-tool.sh and config.yml file as shown in the below commands.
# curl -sO https://packages.wazuh.com/4.10/wazuh-certs-tool.sh
# curl -sO https://packages.wazuh.com/4.10/config.yml
Step 2:
Edit ./config.yml and replace the node names and IP addresses with he corresponding names and IP addresses of your setup. This is required for all the Wazuh server, indexer and dashboard nodes. Add all the nodes that you shall be configuring in the configuration file as mentioned below. Optionally, you can remove the commented code starting with # symbol.
nodes:
  # Wazuh indexer nodes
  indexer:
    - name: node-1
    ip: "<indexer-node-ip>"
    #- name: node-2
     ip: "<indexer-node-ip>"
    #- name: node-3
     ip: "<indexer-node-ip>"

  # Wazuh Server nodes
  # If there is more than one Wazuh server
  # node, each on mush have a node_type
  server:
    - name: wazuh-1
    ip: "<wazuh-manager-ip>"
    # node_type: master
    #- name: wazuh-2
    #  ip: "<wazuh-manager-ip>"
    #  node_type: worker
    #- name: wazuh-3
    #  ip: "<wazuh-manager-ip>"
    #  node_type: worker

  # Wazuh dashboard nodes
  dashboard:
    - name: dashboard
    - ip: "<dashboard-node-ip>"
Step 3:
Generate the certificates by running ./wazuh-certs-tool.sh as shown below.
# chmod +x ./wazuh-certs-tool.sh
# ./wazuh-certs-tool.sh -A
# tar -cvf ./wazuh-certificates.tar -C ./wazuh-certificates/ .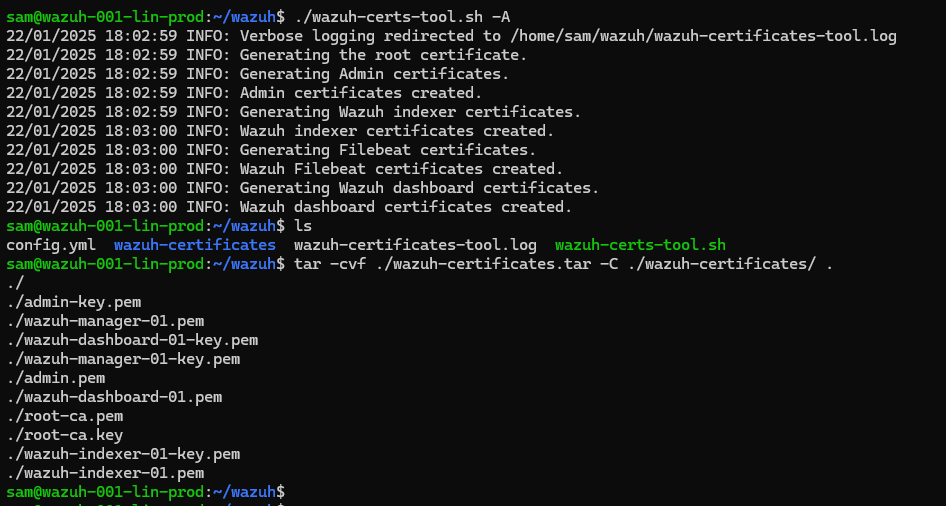
Step 4:
Install below mentioned packages
$ sudo apt install -y gnupg apt-transport-https
Step 5:
Adding the Wazuh repositories on the server
$ curl -s https://packages.wazuh.com/key/GPG-KEY-WAZUH | sudo gpg --no-default-keyring --keyring gnupg-ring:/usr/share/keyrings/wazuh.gpg --import && sudo chmod 644 /usr/share/keyrings/wazuh.gpg
$ echo "deb [signed-by=/usr/share/keyrings/wazuh.gpg] https://packages.wazuh.com/4.x/apt/ stable main" | tee -a /etc/apt/sources.list.d/wazuh.list
$ sudo apt update
By running apt update, we ensure that Wazuh repositories are configured correctly and update the package list.


Step 6:
Since all the dependencies are installed, certificates are generated and the repositories added, it’s time to install the Wazuh indexer.
$ sudo apt install -y wazuh-indexer
Step 7:
Configuring the Wazuh indexer is simple. The configurations for the indexer are stored in /etc/wazuh-indexer/opensearch.yml file. Let’s edit the file. Below is the snippet of the configuration that I am using for my indexer. You can modify the same as per your requirements.
network.host: "0.0.0.0"
node.name: "wazuh-indexer-01"
cluster.initial_master_nodes:
  - "wazuh-indexer-01"
  #- "node-2"
  #- "node-3"
cluster.name: "wazuh-cluster"
#discovery.seed_hosts:
#  - "node-1-ip"
#  - "node-2-ip"
#  - "node-3-ip"
node.max_local_storage_nodes: "3"
path.data: /var/lib/wazuh-indexer
path.logs: /var/log/wazuh-indexer

plugins.security.ssl.http.pemcert_filepath: /etc/wazuh-indexer/certs/indexer.pem
plugins.security.ssl.http.pemkey_filepath: /etc/wazuh-indexer/certs/indexer-key.pem
plugins.security.ssl.http.pemtrustedcas_filepath: /etc/wazuh-indexer/certs/root-ca.pem
plugins.security.ssl.transport.pemcert_filepath: /etc/wazuh-indexer/certs/indexer.pem
plugins.security.ssl.transport.pemkey_filepath: /etc/wazuh-indexer/certs/indexer-key.pem
plugins.security.ssl.transport.pemtrustedcas_filepath: /etc/wazuh-indexer/certs/root-ca.pem
plugins.security.ssl.http.enabled: true
plugins.security.ssl.transport.enforce_hostname_verification: false
plugins.security.ssl.transport.resolve_hostname: false

plugins.security.authcz.admin_dn:
  - "CN=admin,OU=Wazuh,O=Wazuh,L=California,C=US"
plugins.security.check_snapshot_restore_write_privileges: true
plugins.security.enable_snapshot_restore_privilege: true
plugins.security.nodes_dn:
  - "CN=wazuh-indexer-01,OU=Wazuh,O=Wazuh,L=California,C=US"
  #- "CN=node-2,OU=Wazuh,O=Wazuh,L=California,C=US"
  #- "CN=node-3,OU=Wazuh,O=Wazuh,L=California,C=US"
plugins.security.restapi.roles_enabled:
  - "all_access"
  - "security_rest_api_access"

plugins.security.system_indices.enabled: true
plugins.security.system_indices.indices: [".plugins-ml-model", ".plugins-ml-task", ".opendistro-alerting-config", ".ope>

### Option to allow Filebeat-oss 7.10.2 to work ###
compatibility.override_main_response_version: true
Once the above configuration is saved, now we need to install the certificates. Make sure this is done on every node on your indexer cluster. For my setup, I am using single node.
# NODE_NAME=wazuh-indexer-01
# mkdir /etc/wazuh-indexer/certs
# tar -xf ./wazuh-certificates.tar -C /etc/wazuh-indexer/certs/ ./$NODE_NAME.pem ./$NODE_NAME-key.pem ./admin.pem ./admin-key.pem ./root-ca.pem
# mv -n /etc/wazuh-indexer/certs/$NODE_NAME.pem /etc/wazuh-indexer/certs/indexer.pem
# mv -n /etc/wazuh-indexer/certs/$NODE_NAME-key.pem /etc/wazuh-indexer/certs/indexer-key.pem
# chmod 500 /etc/wazuh-indexer/certs
# chmod 400 /etc/wazuh-indexer/certs/*
# chown -R wazuh-indexer:wazuh-indexer /etc/wazuh-indexer/certs
Step 8:
Enabling the Wazuh Indexer service by running the following commands.
$ sudo systemctl daemon-reload
$ sudo systemctl enable wazuh-indexer
$ sudo systemctl start wazuh-indexer
To check the status of your service, run the below command.
$ sudo systemctl status wazuh-indexer
Step 9:
To initialize the cluster, run the indexer-security-init.sh script stored in /usr/share/wazuh-indexer/bin directory.
# /usr/share/wazuh-indexer/bin/indexer-security-init.sh
Verify the cluster working with the below command from another system. Replace 192.168.X.X with your cluster IP address.
$ curl -k -u admin:admin https://192.168.X.X:9200/_cat?nodes?v
Now, we have successfully installed the Wazuh indexer. In the next blog, we shall move towards installing Wazuh Server.