In continuation to my previous blog post on Setting up a low-budget home lab, which illustrated the usage of Proxmox to serve as a bare metal operating system to host the virtual machines, it is good to have a few housekeeping done before we start using the platform. This blog post intends for you to have all the necessary steps listed which can be used to enable the usage of Proxmox VE.
1. Adding non-subscription repositories
By default, Proxmox comes with stable updates repositories which require an active paid subscription to Proxmox in order for you to install or update any packages. But, with my previous experience, even the unstable updates are quite stable and do not need a subscription. Unless you are trying to use the server for production use, unstable updates should work fine for you. For me, my use case is to have a home lab where I can add and remove machines quickly for my own educational purposes, and hence using the non-subscription or unstable repositories.
To add the non-subscription repositories, edit the /etc/apt/sources.list file using the editor of your choice. Add the below line at the end of the file.
# not for production use
deb http://download.proxmox.com/debian buster pve-no-subscription
Now, let’s edit the enterprise list which can be found /etc/apt/sources.list.d/pve-enterprise.list using the editor of your choice. Only do this step, if you do not have a valid subscription for Proxmox. Comment out the line as below by adding a hash (#) in front of the line and save the file. The only reason to perform this step is to avoid any errors related to subscriptions. If you have a subscription to Proxmox, then you can skip this step.
# deb https://enterprise.proxmox.com/debian/pve buster pve-enterpriseAdditionally, if your Ceph is enabled on Proxmox, you can disable it as well, as it will require a Proxmox subscription to update the repository and packages. To disable the Ceph repository, you can edit the file /etc/apt/sources.list.d/ceph.list and add a hash (#) in front of the line as mentioned below.
# deb https://enterprise.proxmox.com/debian/ceph-quincy bookworm enterpriseThen run the following commands.
bash:~# apt update
bash:~# apt dist-upgrade -y
bash:~# reboot
2. Setting up disk partitions
To set up the disks, we will need to remove the data partition, as we shall be using our NVMe SSD for that, and allocate the entire space, 256 GB in my case, to the ‘local’ volume. To perform this action, select the ‘server ‘Datacenter’ from the right-hand side menu as shown in the below figure as ‘Step 1’. Then select ‘Storage’ shown as ‘Step 2’ and then select ‘local-lvm’ from the list of storages. It is important to note that the list of storage would be different for your installation than mine, but the important thing to note is that it should have ‘local’ and ‘local-lvm’ volumes. After selecting ‘local-lvm’ from the list, select ‘Remove’ and confirm any pop-up that appears thereafter.

Now, select ‘local’ volume and click on ‘edit’ as shown in the below figure and marked as ‘Step 1’ and ‘Step 2’ respectively. Select all that is applicable in the ‘content’ dropdown as marked in the below figure as ‘Step 3’. Once done, select ‘OK’. For my use case, I selected ‘VZDump backup file’, ‘ISO Image’, ‘Container Template’, and ‘Snippets’.

Now, select the ‘pve’ server (hostname may differ in your case), where the volume has been just deleted and marked as ‘Step 1’ in the below image. Then select ‘Shell’ from the left-hand menu of the server marked as ‘Step 2’ in the below image and run the following commands.
root@pve:~# lvremove /dev/pve/data
Do you really want to remove active logical volume pve/data? [y/n]: y
    Logical volume "data" successfully removed
root@pve:~# lvresize -l +100%FREE /dev/pve/root
    Size of logical volume pve/root changed from 38.10 GB (9754 extents) to 254.98 GB (65275 extents).
    Logical volume pve/root successfully resized.
root@pve:~# resize2fs /dev/mapper/pve-root
resize2fs 1.47.0 (5-Feb-2023)
Filesystem at /dev/mapper/pve-root is mounted on /; on-line resizing required
old_desc_blocks - 1, new_desc_blocks - 2
The filesystem on /dev/mapper/pve-root is now 66841600 (4k) blocks long.
Now if you look at the local volume in the ‘Datacenter’, you should see full space allocated.
3. Creating a partition on NVMe SSD
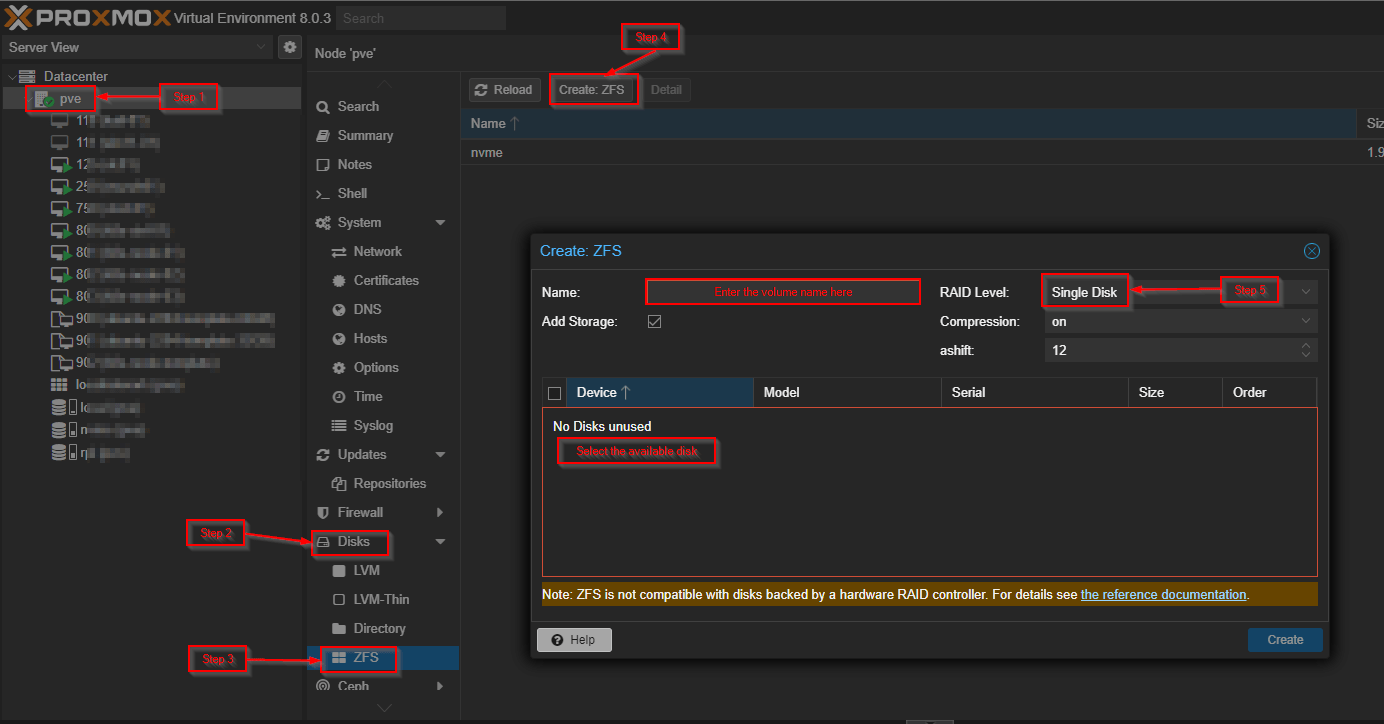
Now once we have set up our root or local volume, it’s time to set up the volume for virtual machines and containers. For this, we shall be using the NVMe SSD that we add. I am using a 2 TB SSD, but you have full liberty to choose the size of the SSD that your need to install. To do this, select the node from the left-hand side menu (for me, ‘pve’) marked as ‘Step 1’.
Follow ‘Step 2’ and ‘Step 3’ as marked in the below image. Click on the ‘Create ZFS’ button highlighted as ‘Step 4’. In the dialog box, add the name of the volume. You can choose any name. For the sake of simplicity, you can see that I already have a configured node and the ZFS volume is ‘nvme’. If you have only one SSD, then select a single disk. If you have multiple disks, then you can select appropriate RAID levels based on the number of disks available in your system. You can refer to the Wikipedia page for RAID for further reference to the number of disks required.
Select all the available disks from the list of disks in the dialog as per your RAID configuration and click on the ‘Create’ button. You will see the ZFS volume with your provided name created. You can verify the configuration of your disk by selecting the volume and clicking on the ‘Detail’ button beside the ‘Create ZFS’ button.
Once your volume is created, you can navigate to ‘Datacenter’, then select ‘Storage’ from the datacenter menu and select the new ZFS volume created. Select ‘Edit’ and then select the required content types in the dialog box. For my use case, I am using this for ‘Disk Image’ and ‘Container’. You can follow the steps similar to the one followed in Section 2 above.
4. Check S.M.A.R.T. monitoring for all the disks
Self Monitoring, Analysis, and Reporting Technology System (S.M.A.R.T.) is a monitoring system for the disks that provides any error information that may occur on your disks. It is good to have S.M.A.R.T. monitoring for your disks turned on. To check the status, navigate to your node (‘pve’ for me) under the ‘Datacenter’ hierarchy. Then select ‘Disks’ from the left-hand side node menu. In your list of disks, you will see the status for S.M.A.R.T. which should say ‘PASSED’ to ensure the complete health of your disks. If you double-click on the status, it will show you the details as shown here in the below image.

You can also check the status via the command line either by login into ssh or directly via ‘Shell’ access from the web interface.
root@pve:~# smartctl -a <DEV_NAME>5. Adding SMB shares
An SMB share can be very useful when you have a NAS or an SMB-shared system in your network. All heavy data can be shared to your SMB share and pulled whenever required. To add an SMB share, select ‘Datacenter’ and navigate to ‘Storage’ from the left-hand side menu of the datacenter. Click on the ‘Add’ button and select ‘SMB/CIFS’ from the list of available options illustrated as ‘Step 2’ and ‘Step 3’ respectively in the below image.

Fill in all the required details. Ensure the IP is reachable from your Proxmox machine. Provide the username in the DOMAIN/USER format. For local users, you can use './<USERNAME>' notation. Select the Share name from the dropdown. If you want to specify a specific directory, then you can add it in the ‘Subdirectory’ input box below. If your share requires domain authentication, then you can provide the SMB Domain name in the ‘Domain’ input box. Once all the details are added, click on the ‘Add’ button to add your share.

Once the share is successfully added, it will be listed as shown in the below image.

Not all of the above steps are required that are mentioned in this blog, but it helps in using Proxmox in a more efficient and effective way. Now, your Proxmox is ready for running your virtual machines or LX containers.